- Our Building Philosophy
- Our Process
- Home Plans
- Our Work
- Reviews & Awards
September 12, 2016
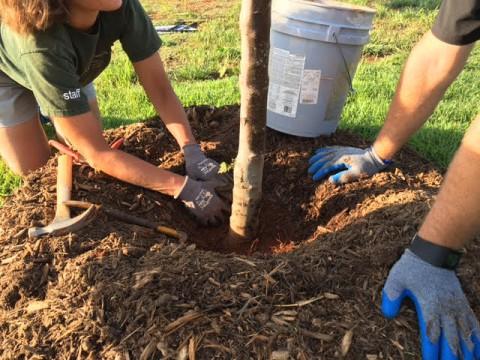
When planting trees, don’t dig down too deep or mulch up too high. Be sure the tree’s trunk flare is partially visible and surrounded by a mulch-free area approximately 1 to 2 inches wide.
Fall is finally here — and once the leaves drop, it’ll be the perfect time for planting trees.
The Addison Homes staff met with our friends at TreesGreenville to talk best practices for planting to ensure healthier, longer-lived trees. We learned that oftimes, people dig down too deep and/or mulch up too high – but in order for a tree to thrive, its trunk flare must be above the ground and surrounded by a mulch-free area approximately 1-2 inches wide at the base.
Think of how kids draw trees: almost always, their pictures include the flares at the bottom — which is exactly how trees should look in real life.
Read on for best practices when planting trees, from a brochure published by the International Society of Arboriculture:
WHEN TO PLANT: Ideally, trees are planted during the dormant season — in the fall after leaf drop or in early spring before budbreak. Weather conditions are cool and allow plants to establish roots in the new location before spring rains and summer heat stimulate new top growth. Healthy balled and burlapped or container trees, however, can be planted throughout the growing season if given appropriate care.
PLANTING STRESS: Balled and burlapped trees lose a significant portion of their root system when dug at the nursery. As a result, trees commonly exhibit what is known as “transplant shock.” Transplant shock is a state of slowed growth and reduced vitality following transplanting. Container trees may also experience transplant shock, particularly if they have circling or kinked roots that must be cut. Proper site preparation, careful handling to prevent further root damage, and good follow-up care reduces transplant shock and promotes faster recovery.
Carefully follow the nine simple steps below when planting trees to help them establish quickly in their new locations. Note: Before you begin planting your tree, be sure you have located all underground utilities prior to digging.
- IDENTIFY THE TRUNK FLARE. The trunk flare is where the trunk expands at the base of the tree. This point should be partially visible after the tree has been planted. Remove excess soil from the top of the root ball prior to planting if the root flare is not visible.
- DIG A SHALLOW, BROAD PLANTING HOLE. Holes should be 2 to 3 times wider than the root ball, but only as deep as the root ball. Digging a broad planting pit breaks up the surrounding soil and provides newly emerging tree roots room to expand.
- REMOVE THE CONTAINERS OR CUT AWAY THE WIRE BASKET. e Inspect container tree root balls for circling roots. Straighten, cut or remove them. Expose the trunk flare, if necessary.
- PLACE THE TREE AT THE PROPER HEIGHT. Take care to dig the hole to the proper depth — and no more. The majority of a tree’s roots develop in the top 12 inches of soil. If the tree is planted too deep, new roots will have difficulty developing because of a lack of oxygen. In poorly drained or heavily clayed soils, trees can be planted with the base of the trunk flare 2 to 3 inches above grade. When placing the tree in the hole, lift it by the root ball, not the trunk.
- STRAIGHTEN THE TREE IN THE HOLE. Before backfilling, have someone view the tree from several directions to confirm it is straight. Once planted, it is difficult to reposition the tree.
- FILL THE HOLE GENTLY, BUT FIRMLY. Pack soil around the base of the root ball to stabilize it. If the root ball is wrapped, carefully cut and remove any fabric, plastic, string, and/or wire from around the trunk and root ball to prevent girdling and to facilitate root growth. Fill the remainder of the hole, firmly packing the soil to eliminate air pockets that may dry out roots. Further reduce air pockets by watering periodically while backfilling. Avoid fertilization at the time of planting.
- STAKE THE TREE, IF NECESSARY. Studies have shown that trees establish more quickly and develop stronger trunk and root systems if they are not staked at the time of planting. Staking may be required, however, when planting bare root stock or planting on windy sites. Stakes may also offer protection against lawn mower damage and vandalism. One or two stakes used in conjunction with a wide, flexible tie material on the lower half of the tree will hold the tree upright and minimize injury to the trunk, yet still allow movement. Remove support staking and ties after the first year of growth.
- MULCH THE BASE OF THE TREE. Mulch is organic matter spread around the base of a tree to hold moisture, moderate soil temperature extremes, and reduce grass and weed competition. Common mulches include leaf litter, pine straw, shredded bark, peat moss, or composted wood chips. A 2- to 4-inch layer is ideal. More than 4 inches may cause a problem with oxygen and moisture levels. Piling mulch right up against the trunk of a tree may cause decay of the living bark. A mulch-free area, 1 to 2 inches wide at the base of the tree, reduces moist bark conditions and prevents decay.
- PROVIDE FOLLOW-UP CARE. Keep the soil moist, but not waterlogged. Water trees at least once a week, barring rain, and more frequently during hot, windy weather. When the soil is dry below the surface of the mulch, it is time to water. Continue until mid-fall, tapering off as lower temperatures require less-frequent watering.
Other follow-up care may include minor pruning of branches damaged during the planting process. Prune sparingly after planting and delay necessary corrective pruning until a full season of growth in the new location has occurred. Completing these nine simple steps will maximize the likelihood that your new trees will grow and thrive in their new home.
Information reprinted with permission from International Society of Arboriculture and TreesAreGood.org.
Latest Blog Posts
DOE’S HOUSING INNOVATION AWARDS PROGRAM RECOGNIZES NATION’S TOP BUILDERS ON THE PATH TO ZERO ENERGY READY HOMESTwo Addison Homes projects have earned 2016 Housing Innovation Awards from the U.S.... Read more

Addison Homes won the Southern Home & Garden Bridge Award for Green Building for the third consecutive year.This award-winning green home enjoys a savvy-yet-simple aesthetic – neutral palette,... Read more
We are pleased to announce that Addison Homes has received a 2015 Housing Innovation Award from the U.S. Department of Energy. A new home builder in Greenville and Upstate SC, we are being recognized... Read more